

Did you know you can collect pastel dust and broken bits, and easily re-form sticks with it? Surprisingly, I learned this rather late. Here’s a quick guide on how to make pastel sticks from broken pastels.
Gathering Pastel Bits and Dust
It’s annoying, I know. Sometimes you’re painting away with your soft pastels, and tiny bits breaks off. Other times, a particularly fragile stick seems to crumble, when painting too aggressively. Maddeningly, these remnants are too small to hold.
Further, while you work, little piles of pastel dust collect on the easel’s shelf. Argh!
Every so often, I used to wipe both the bits and dust away with a damp cloth.
Now, however, I collect it all in little marmalade jars and condiment cups. Pastels are expensive, they will only get more costly, and I was raised to be thrifty.
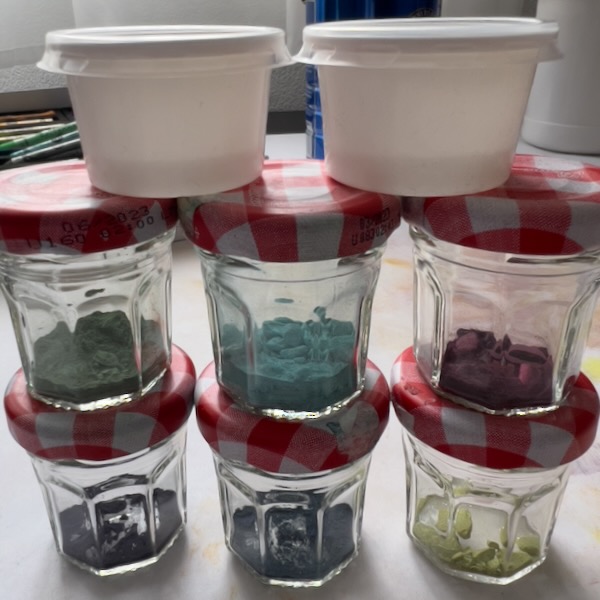
As I work on a painting, I sometimes use a lot of similar colors at once. That means the dust that gathers on my easel’s shelf is also similar in color. Other times, I change colors frequently, creating a multicolored dust.
In both cases, every so often I carefully sweep the dust and broken bits into my little jars, sorted by color. (Multicolor dust makes interesting shades of gray.) I store these until I have enough to form a stick.
Tip: Try lining your easel’s shelf with a smooth paper or Glassine. Then, as pastel dust collects, tip the paper every so often into a jar. Tap gently, so the pastel residue slides off the paper without creating airborne dust.
Note: Pastel dust shouldn’t be breathed. Read my complete, no-nonsense guide to Working Safely with Pastels.
How to Make Pastel Sticks from Broken Pastels
Once a little bottle of collected pastel bits gets full enough, it’s time to make a pastel stick.
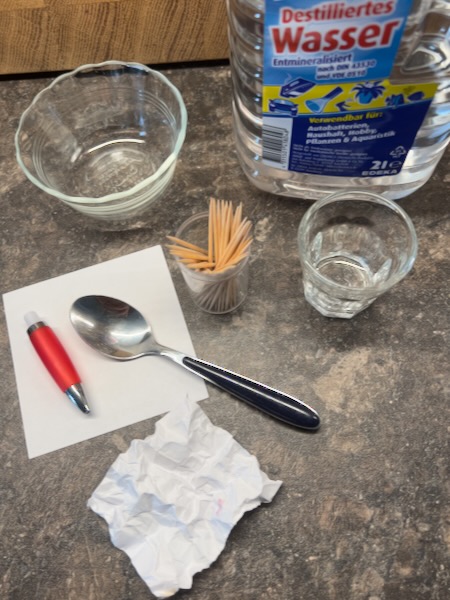
Materials
- A bottle of collected pastel dust and bits
- A small glass, metal, or glazed ceramic bowl
- A shot glass, to hold a little water
- A teaspoon (with a pointy-tipped handle, if you have one)
- (A toothpick if your spoon’s handle isn’t pointy)
- Distilled water (distilled won’t add any hard minerals, but regular water will do in a pinch)
- A way to create water droplets: a clean pipette (dropper), the tip of a retractable pen casing, a pencil, etc.
- A scrap of plastic wrap, smooth paper, or Glassine
- A crumpled scrap of paper, opened and laid flattish
Instructions
- Put the dust and pieces in the bowl, and crush any clumps with the back of the spoon. Aim for an even powder.
- Pour a little water in the glass.
- Then, using distilled water and your dropper, apply one drop of the distilled water to the pastel dust. Mix them together using the pointy tip of your spoon’s handle, or a toothpick.
- Add more drops one by one, mixing each in well, just until you have a thick paste that sticks together.
- Place the paste on a scrap of plastic wrap, or paper, and roll it into a firm stick.
- Crumple a scrap piece of paper well, then open it up kind of (but not too) flattish. Place the stick gently on the paper, which will allow air to get under the stick. (You can also finely accordion-fold the paper.)
- Let the stick completely air dry. Unless it’s really humid, two or three days should be long enough. (If the stick feels cooler than room temperature, it may still be damp inside.)
- Use your new pastel color!
I hope you’ve enjoyed this quick guide on how to make pastels sticks from broken pastels.
Related topics
- Read my complete, no-nonsense guide to Working Safely with Pastels.
- Learn to make an easy, effective, all-natural, non-toxic DIY Pastel Fixative, inspired by Degas! (Coming very soon!)
Thanks for your time and attention, both are valuable. 🙏🏻
I invite you to view my photographs and paintings, and to learn more about me.
If you liked this post, you have options:
- Check out the art available in my shop!
- Buy me a coffee (I’d be so grateful!), or check out my Patreon (coming soon!).
- Sign up for my monthly newsletter, full of delicious tidbits.
- Follow my blog with RSS, using a feed reader like Feedly.
- Browse my other blog posts.
©Marlene Breitenstein. I welcome your inquiries about purchasing, licensing, or republishing my work. I take my intellectual property seriously. This post and its contents, unless otherwise noted, is owned by Marlene Breitenstein. It is not to be reproduced, copied, or published in derivative, without permission from the artist.